

How-To: Repair your Rear Derailleur
Demystifying rear derailleur repair

The rear derailleur is the heart of most mountain bike drivetrains. As the 1x drivetrain (one chainring in the front with a big cluster of gears in the back) becomes standard issue on cross-country, trail and enduro bikes, there’s just one shifter, cable and derailleur to adjust for top-to-bottom gear range performance. The bike industry is also seeing the 1x drivetrain in cyclocross and touring bikes, like Kona’s Dr. Dew and Rove NRB, both of which we offer as rentals on our guided bike tours. If you’re riding one of these bikes, here’s a handy guide to fix some common shifting problems when it comes to the rear derailleur.
Derailleur Basics
The rear derailleur is made of pulley wheels, springs and leverage mechanisms that move when pulled by a cable. The derailleur moves inward or outward from the cassette, making the chain move up or down the gear cluster as the wheels and springs keep tension on the chain to maintain its position. The most common derailleurs come from SRAM and Shimano. Each brand of derailleur has its own unique features, but all derailleurs have basically similar designs and means of adjustment.
- The biggest gear on the cassette (the gear cluster on your back wheel) is the lowest gear. The smallest gear on the cassette is the highest gear.
- Most shifting adjustment should start with the chain in the highest gear.
- Before any cable adjustment is done, check derailleur alignment and limit screw position.
Derailleur Alignment
Start trouble-shooting by making sure your derailleur is properly secured to your bike. The point of contact between your derailleur and your bike is the derailleur hanger. Some bikes have removable or replaceable hangers, while other bikes (usually older ones) have built-in hangers that are part of the frame’s structure. The derailleur hanger must be exactly perpendicular to the rear wheel and cassette for accurate shifting.
If your derailleur hanger is bent, you should replace your hanger or take your bike to a local shop. It’s usually okay to re-bend many derailleur hangers into alignment. This is because there is very little stress from riding the bike or shifting gears. As a rule of thumb, if a hanger survives a repair by bending, it will survive use. But there are some hangers that you should just replace; extremely thick hangers and titanium hangers are difficult and sometimes impossible to repair.
Limit Screw Adjustment
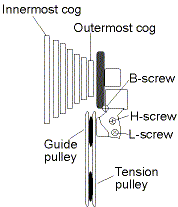
Oh, limit screws! They can be so confusing. Here’s what they do: limit screws set the limit of travel on the derailleur toward or away from the spokes / cassette.
The low limit screw adjusts how far up the cassette the chain will go, toward the lowest / easiest gear. If the limit screw is too open, the chain could shift over the top of the lowest gear and drop down in between the cassette and the spokes. This could cause spoke damage or a broken chain. If the low limit screw is too tight, the chain will not reach the lowest/ easiest gear. The same applies for the high limit screw, but it applies to the smallest gears on the cassette.
The B-tension screw sets the height of the top pulley wheel in relation to the cassette. Accurate setting of this screw is important when shifting into the lowest gear. If the guide wheel is too close (high), the cassette and derailleur can run into each other and cause friction. If the guide wheel is too low, accuracy is compromised because the chain tension is dangerously increased in the lowest gear . Each derailleur brand specifies the specific gap measurement, but you should be able to eyeball it by twisting the B-tension screw.
In the image, the limit screws are the H-screw (high limit), L-screw (low limit) and the B-screw (B-tension).
Cable Friction
A gunked-up system can make your bike shift badly. Check how easily the shifter cable (the steel wire) slides through the shifter housing (the black hose around the wire). Shift the into the highest (smallest) gear and loosen the cable retention screw on the derailleur. The cable is now free and you can manually slide the cable back and forth, feeling for friction. You’ll find friction at the ends of the housing. You may have multiple pieces of housing to check or just one long piece covering the entire cable. Make sure your cable, housing ends and ferules (the little metal caps that cover housing ends) are clean. Once clean, a thin coating of lubricant will help keep things smooth.
- If your cable is kinked or damaged, see your shifter brand’s instructional manuals for how to replace the cable. Whether SRAM or Shimano, changing a cable is pretty easy. If you replace a cable, it’s a good idea to replace the housing to make sure your whole system is fresh and clean.
- BUT make sure you buy shifter housing. It looks a lot like brake housing, but shifter housing is a different type of tube.
- The total cost of a new rear derailleur cable and a few feet of shifter housing should be between $10 and $20.
Make sure that the cable is accurately traveling through the system as intended. Some derailleurs have easy-to-miss cable routing. If the cable misses a guide or port, the system won’t work right.
Cable Tension Adjustment
Cable tension adjustment is easy to do as long as you follow some simple steps.
- Make sure your chain is in the highest (smallest) gear on the cassette and the barrel adjuster on your shifter is threaded all the way in so it provides no extra tension.
- Once your cable is routed from your shifter to your rear derailleur properly, pull the cable snug, but not overly tight, and secure the cable tension screw on your derailleur.
- Pedal forward and shift one gear. If the chain doesn’t move to the next cog, add tension to the cable. If the chain moves up two or more cogs with one click of the shifter, your cable is too tight.
- Add cable tension by rotating the barrel adjuster the appropriate direction on the shifter. This takes out any slack in the cable, helping activate the derailleur.
- If your cable is too tight and your barrel adjuster is all the way in, you’ll need to loosen the cable clamp bolt on your rear derailleur and adjust the cable slightly slacker. From there, repeat the shifting steps and adjust your barrel adjuster accordingly if necessary.
Once your shifting is dialed, go ride! Don’t forget to keep your drivetrain clean and lubed to maximize the life of its components and shifting accuracy.
![]()
Wilderness Voyageurs operates Inn-to-Inn Bicycle Vacations
All Wilderness Voyageurs tours are fully supported with a SAG vehicle and include beautiful routes through stunning landscapes, excellent food and accommodations, top rate equipment, dedicated and enthusiastic guides.
Give our wonderful reservation staff a call to book your next bike tour vacation. (800) 272 – 4141