
How-To: Get Your Bike Ready for Spring
How to get your bike ready for springtime
Unless you’re a hardcore winter cyclist, your bike has probably sat in the garage all winter. But now it’s springtime, and it’s time to get out and ride! Get your bike ready to for spring with a few easy steps.

Clean off that winter grit
Wash off winter salt, sand, and grime with low-pressure water from a hose. Don’t use high-pressure sprayers, because they can force water into sealed-off bits that should stay nice and greasy.
Check your chain
Is your chain worn out? Chains usually last about for 2000 to 3000 miles, depending on your riding style. If you ride a lot in muddy conditions or tend to grind in a really high gear, you might get less use out of your chain. (If your chain is very dirty, the grit that sticks to your chain lube acts as a grinding paste, causing the pins and rollers to wear down.)
The easiest way to figure out if you need a new chain is to use a chain-checker, which measures how badly your current chain has stretched. If you’ve had that chain on for a while but you’re still not sure if it needs replacing, just have a professional mechanic look at your bike.
Brake and shift cables
 Check your brake and shift cables for damage and make sure they’re properly tensioned. If the brakes feel a little loosey goosey, or your bike isn’t shifting properly, they might need to be tightened or replaced. If your cables are frayed or broken in the middle, they need to be replaced. But if they’re frayed at the end, you can fix them yourself!
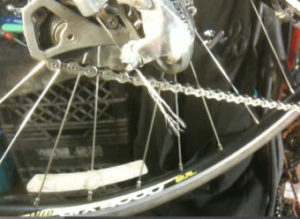
The photo on the right shows a frayed cable. The frayed ends of a brake cable can be sharp, eventually fray more, and they make your bike look bad.
You can fix this problem by twisting the frayed wires together like a bread tie. Once the wires are as tight as can be, use wire cutters to snip off the ends to make them all match. Then take a wire cap and put it on the end of the once-frayed cables. Use a pliers to smash the ends of the cap so it doesn’t move, and you’re done!
Check your wheels
 When you spin your bike wheels, do they wobble around? A wobbly wheel is a referred to as “out of true.”
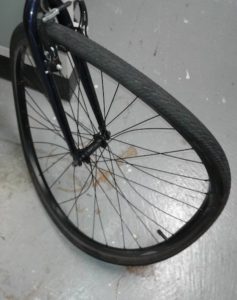
The typical bicycle wheel is composed of a rim held onto a center hub by tensioned spokes. Each spoke pulls on a section of the rim to make the wheel spin evenly. If your spokes are too loose or too tight, they’ll pull the rim in different directions and cause the wheel to move in an imbalanced way. An out of true wheel could make turning difficult or cause your brakes to stutter and lock up.
This photo shows a wheel that’s severely out of true, which can happen in a crash.
If you have a home repair shop and a truing stand, you can try to fix your own wheel. But it can be a finicky process that requires an eye for precision. If you’ve got some wheel wobble, take the bike to your local shop, and they can get you rolling in no time.
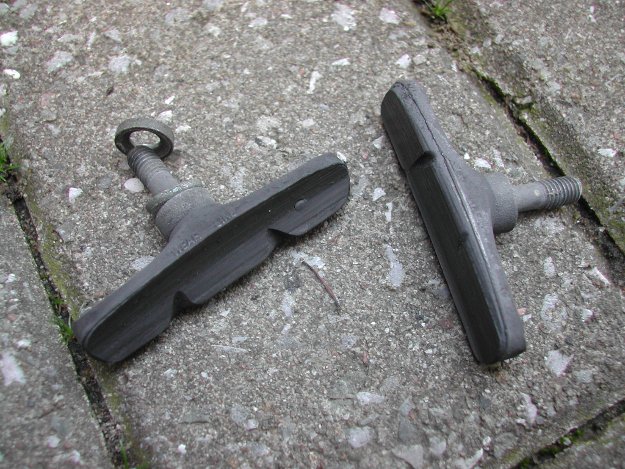
Check your brake pads
 Are your brakes pads thin from a long winter of braking in rainy, snowy muck? If your brake pads are worn down, they won’t slow your bike down enough to stop when you want! Replace them when they look flat and smooth.
Check out this handy guide to replacing your brake pads, or bring your bike into a shop. It should only take a few minutes, and you’ll be rolling out the door in no time.
Check for flats
Make sure your tires are pumped up and hole-free. Here’s a video on how to fix a flat tire, if you’ve got one. If you’re using knobby winter tires, now might be a good time to swap them out for smooth-rolling summer tires. Just like your car, a bike works best with fresh tires!
Listen to your bottom bracket
 Take the chain off your front chainring. Once it’s disconnected, give the cranks a spin. If there’s any grinding noise or resistance (it should be silent), it’s probably time for a bottom bracket overhaul.
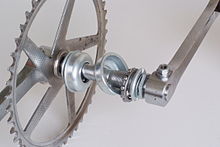
The bottom bracket (shown here) is a bicycle component used to connect a bicycle’s crankset to its frame, allowing it to rotate independently of the frame itself.
The bottom bracket is normally threaded, but sometimes pressed, into a frame’s bottom bracket shell — that’s the sleeve that connects the tubes to the frame’s front triangle. Without a bottom bracket your bike’s transmission would not be able to rotate.
Bottom brackets use bearings to allow for rotation and are usually considered a service item. Some can be adjusted or rebuilt, but modern designs are more frequently designed to be replaced rather than repaired.
Extra credit
These things are good to do any time of the year, and they’ll help your rides go smoothly:
- Check that your frame pump and/or CO2 inflators work.
- Check that your saddle bag has tools, a patch kit and a spare tube.
- Put a couple drops of chain lube on front and rear derailleur pivots (the parts that move)
- Check your rims for brake wear or cracks at the spoke holes — you’ll need new rims if they’re worn or cracked.
- Check your shoe cleats and replace if they’re rusty or worn.
- Lubricate shift and brake cables.
Go for a ride!
Now your bike should be rolling smooth, and you’re ready to enjoy the glorious spring weather!
![]()
Wilderness Voyageurs operates Inn-to-Inn Bicycle Vacations
All Wilderness Voyageurs tours are fully supported with a SAG vehicle and include beautiful routes through stunning landscapes, excellent food and accommodations, top rate equipment, dedicated and enthusiastic guides.
Give our wonderful reservation staff a call to book your next bike tour vacation. (800) 272 – 4141